Setting up Blazor WASM with GitHub Pages
This was needlessly tiresome, purely due to not elevating the permissions of GITHUB_TOKEN. If you learn nothing else from this post, remember that.
For reference, I’m on Linux and thus have no direct access to Visual Studio. These are all command-line based solutions, so please feel free to adapt these to whatever platform is relevant to you. If you happen to use Visual Studio, the project setup should be significantly easier.
Initial steps
First, you need to set up your Blazor WASM project.
Open a terminal in whatever directory you want to make the project in. Assuming you’re running a Linux distro, you’d do the following:
cd whatever-directory-you-want-to-be-in
dotnet new blazorwasm -n WhateverNameYouWant
The -n is the name of the output. If you don’t provide anything, it’ll just use the output directory name.
Now you need to create a .gitignore. This is purely to avoid pushing 100’s of un-needed files at once. You could create the file and manually input each file you want to avoid. However, I didn’t do that. Instead, I used Toptal’s gitignore generator, typed in CSharp and simply pasted the raw result into a .gitignore file. This seems to cover most, if not all bases and is sufficient enough for me.
After this, you’d just push all these changes to your repository and move onto the next stage.
Preparing your repository for GitHub Actions
This is where I made a mistake on my initial setup and would’ve avoided countless pointless commits.
First, go to your desired repository’s settings, as seen in the screenshot below:

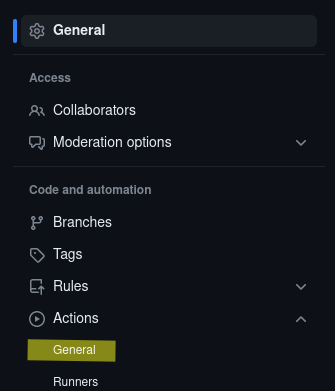
This will take you to your repository’s settings. From here, you’ll want to locate the “Actions” sidebar option and as of the date of the creation of this markdown file (namely 14/08/2023), it can be found under Actions -> General. It will look something like the screenshot below:
From here, you’ll need to find the “Workflow Permissions”, which should be somewhere down the page. You need to locate a radio button that states “Read and write permissions”. You likely don’t have this checked, as GitHub by default doesn’t allow actions to have read/write permissions across all scopes in a repository. You want to change this, as your GITHUB_TOKEN (something that you’ll need in later stages with your workflow file) doesn’t currently have the elevated permissions to write.
The radio buttons should look like something below (do note that I’ve already selected the read/write permission):
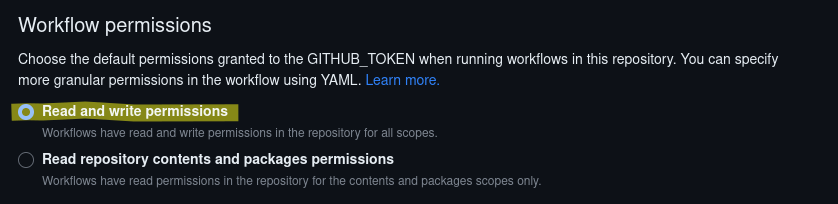
This step is crucial, as it appears that our GitHub Actions workflow cannot make and push changes to the gh-pages branch. I’m not totally sure on the implications of this, but that appears to be the reason as to why - given that without this, you’ll get a git exit code 128. This and other solutions can be found at this StackOverflow answer.
Setting up the .yml workflow file
As suggested, we need a workflow file in order to deploy it and, well, use it. I’ll explain each aspect of the .yml file so you know why you’re doing each step, but the overall file can be found at the end of this post and will also be shown in my personal repository on GitHub.
name: Deploy to GitHub Pages # The name of the workflow

# Run workflow on every push to the main branch
on:
  push:
    branches: [ main ]
# Also runs workflow on every pull request to the main branch
  pull_request:
    branches: [ main ]
This does a set of things. First, it names the workflow. Naming it something useful and self-explanatory will help in future maintenance. The “on:…” ensures that this workflow will run on either pushing to main, or whenever you make a pull request to main. The latter can be useful to determine if a pull request’s changes will succeed, but if this introduces errors, you can remove it.
jobs:
  deploy-to-github-pages:
    # use ubuntu-latest image to run steps on
    runs-on: ubuntu-latest
    steps:
    # uses GitHub's checkout action to checkout code from the master/main branch
    - uses: actions/checkout@v3.5.3
You can have multiple separate jobs running from the same workflow file, but in this case we just have the one, deploy-to-github-pages. You’ll see that name in your actions tab’s logs, so make sure to name it something useful. We’re choosing to run it on Ubuntu as this gives us access to Ubuntu’s repositories, alongside Bash, but you could use something like Windows. We’re using GitHub’s checkout workflow action to checkout the code from the master/main branch. We want to do this as we’re not pushing this page to main, we’re pushing it to gh-pages. Why?
In short, it’s because we can’t use the project as is on GitHub Pages as a hosted website - it doesn’t know how to work with it. It does know how to work with static HTML pages however and this workflow file will create that.
    # Sets up .NET Core SDK 7.0
    - name: Setup .NET Core SDK
      uses: actions/setup-dotnet@v3.2.0
      with:
        dotnet-version: 7.0

    # Publishes the Blazor project to a release folder
    - name: Publish .NET Core Project
      run: dotnet publish YourProjectNameHere.csproj -c Release -o release --nologo
The comments explain what each step does, but there’s a few things worth noting. First, this project uses .NET 7, hence why we’ve specified the version. The publish step will make sure to both build and bundle any third-party libraries needed. We’ve added -c to make sure it configures the build for release and -o to specify the output to a release directory. The –nologo exists to decrease the amount of verbose output. Most, if not all of the current explanation comes from this very helpful guide by Swimburger.
    # Changes the base-tag in index.html from "/" to match repo subdirectory
    - name: Change base-tag in index.html from / to Whatever Your Project Is Called
      run: sed -i 's/<base href="\/" \/>/<base href="\/Your-Project-Here\/" \/>/g' release/wwwroot/index.html

    # Copy index.html to 404.html to account for missing file
    - name: copy index.html to 404.html
      run: cp release/wwwroot/index.html release/wwwroot/404.html

    - name: Add .nojekyll file
      run: touch release/wwwroot/.nojekyll
This does a set of things. Remember how we decided to use Linux? This is because it has access to sed, which allows us to edit specific lines in a file via the command line. If you’re using Powershell, then there may be an alternative to this. Regardless, this simply replaces the href from being “/” to matching your repository name. This is esssential, as otherwise it will be unable to load your homepage - or any page - without it.
Copying index.html to 404.html is, however, optional. This was done out of laziness, but you could make your own 404.html file. Finally, there’s the .nojekyll file. This is needed as GitHub Pages expects Jekyll files to host the webpage, which this will not have. Thus, we create an empty nojekyll file to inform GitHub that we’re using our own custom static solution.
    - name: Deploy GitHub Pages site
      uses: peaceiris/actions-gh-pages@v3
      with:
        github_token: ${{ secrets.GITHUB_TOKEN }}
        publish_dir: release/wwwroot
This will, after all the previous steps, deploy the GitHub Pages site using the release folder. The GitHub token is what’s used to give the workflow permission to create and push to the desired branch. We specify release/wwwroot, as that’s the folder GitHub Pages will use to operate the site, which should contain everything we need.
That’s everything, but if you want the full script, see below. Hopefully this helps you out as much as it helps me and if there’s anything incorrect or worthy of correction within this blog, please feel free to open an issue on this blog!
Full workflow file script
name: Deploy to GitHub Pages

# Run workflow on every push to the main branch
on:
  push:
    branches: [ main ]

  pull_request:
    branches: [ main ]

jobs:
  deploy-to-github-pages:
    # use ubuntu-latest image to run steps on
    runs-on: ubuntu-latest
    steps:
    # uses GitHub's checkout action to checkout code from the master branch
    - uses: actions/checkout@v3.5.3

    # Sets up .NET Core SDK 7.0
    - name: Setup .NET Core SDK
      uses: actions/setup-dotnet@v3.2.0
      with:
        dotnet-version: 7.0

    # Publishes the Blazor project to a release folder
    - name: Publish .NET Core Project
      run: dotnet publish YourProjectNameHere.csproj -c Release -o release --nologo

    # Changes the base-tag in index.html from "/" to match repo subdirectory
    - name: Change base-tag in index.html from / to Whatever Your Project Is Called
      run: sed -i 's/<base href="\/" \/>/<base href="\/Your-Project-Here\/" \/>/g' release/wwwroot/index.html

    # Copy index.html to 404.html to account for missing file
    - name: copy index.html to 404.html
      run: cp release/wwwroot/index.html release/wwwroot/404.html

    - name: Add .nojekyll file
      run: touch release/wwwroot/.nojekyll

    - name: Deploy GitHub Pages site
      uses: peaceiris/actions-gh-pages@v3
      with:
        github_token: ${{ secrets.GITHUB_TOKEN }}
        publish_dir: release/wwwroot

# Based heavily on https://github.com/Swimburger/BlazorGitHubPagesDemo/blob/master/.github/workflows/main.yml, with some alterations